This is a great free tool to handle all your cloning / partitioning / hard disk management requirements http://www.partitionwizard.com. This time it had a small hitch though, as I cloned my 640GB drive to new 1TB drive via USB connection. It copied everything fine, but when I swapped drives and tried to boot using the new HD -- I had no luck. The master boot records (MBR) needed some fixing, is what I gathered from some detective work.
Steps to get around the situation:
- In Windows 7 use the 'Create a System Repair Disc' (assuming you still have a CD burner!)
- Connect your new HD via USB
- Use Partition Wizard to clone your active drive to the new one (this is possibly an overnight operation of a few hours)
- Once the operation is done, swap in the new hard disk, keep your fingers crossed and try booting
- No boot errors, Windows starts as per usual? GREAT! If not, boot into the CD we made earlier (change your BIOS settings or use the appropriate shortcut to do this)
- The repair tool will start, it will detect the copied Windows partition on your new HD, select it
- Go to the 'Command Prompt' once you get to the menu
- type 'bootrec /fixmbr' and that should fix things up. Try re-booting.
- If it didn't work, boot back into the CD, follow the process above, type 'bootrec /?' for more repair option.
- Once you're back inside Windows, remember to format/allocate the unallocated space on your shiny new larger hard drive! You can use Partition Wizard for this too.
DONE.
April 1, 2015
November 4, 2014
List of Chrome URLs
Calling all geeks: cool stuff you can do in Google Chrome, use the commands below.
(Don't click on the links, that will take you to Quora, as I got it from there.)
The following pages are for debugging purposes only. Because they crash or hang the renderer, they're not linked directly; you can type them into the address bar if you need them.
(Don't click on the links, that will take you to Quora, as I got it from there.)
- chrome://accessibility
- chrome://appcache-internals
- chrome://apps
- chrome://blob-internals
- chrome://bookmarks
- chrome://cache
- chrome://chrome
- chrome://chrome-urls
- chrome://components
- chrome://conflicts
- chrome://crashes
- chrome://credits
- chrome://devices
- chrome://dns
- chrome://downloads
- chrome://extensions
- chrome://flags
- chrome://flash
- chrome://gcm-internals
- chrome://gpu
- chrome://help
- chrome://histograms
- chrome://history
- chrome://indexeddb-internals
- chrome://inspect
- chrome://invalidations
- chrome://ipc
- chrome://media-internals
- chrome://memory
- chrome://memory-internals
- chrome://nacl
- chrome://net-internals
- chrome://newtab
- chrome://omnibox
- chrome://password-manager-
internals - chrome://plugins
- chrome://policy
- chrome://predictors
- chrome://print
- chrome://profiler
- chrome://quota-internals
- chrome://serviceworker-interna
ls - chrome://settings
- chrome://signin-internals
- chrome://stats
- chrome://suggestions
- chrome://sync-internals
- chrome://system
- chrome://terms
- chrome://thumbnails
- chrome://tracing
- chrome://translate-internals
- chrome://user-actions
- chrome://version
- chrome://view-http-cache
- chrome://voicesearch
- chrome://webrtc-internals
- chrome://webrtc-logs
The following pages are for debugging purposes only. Because they crash or hang the renderer, they're not linked directly; you can type them into the address bar if you need them.
April 16, 2014
How to connect an android phone to an WiFi AD-HOC network
https://www.youtube.com/watch?v=ksKun4i-dns
Technically you should be fine with the first 5 steps. After that, if it dies at any point, repeat steps 1 to 4. Make a batch file!
1. start, cmd - run as administrator
2. netsh wlan set hostednetwork mode="allow" ssid=test key=12345678
3. netsh wlan stop hostednetwork
4. netsh wlan start hostednetwork
5. Share the internet connection between Microsoft virtual WIFI
miniport adapter and YOUR INTERNET CONNECTION
6. Connect your android phone/tablet to new network called "test" enter the
password: "12345678" and set the DHCP settings to static or manual:
8. After restarting windows, you should again type 4.step command. OR just create a shortcut on your desktop with netsh wlan start hostednetwork.
April 2, 2013
Notes for noob Android users!
I've had a slew of new Android smartphone users around me, including my mom! So imma share a few things I end up repeating and have experienced with all of 'em on the qwerks of Android.
The keyboard is switchable!
Long-press a blank text box to access Input Methods and see what options you have. I highly recommend getting Swype. On most new phones it's available in Input Options, you just have to enable it. It will take you a few minutes to get used to it, trust me. You'll spend much less time typing, and correcting what you type. If it's not on your phone, get it off Swype.com as it doesn't appear on Google Play (at least for me).
When adding contacts, choose to store them in your Gmail account:
This way, it auto-syncs (provided you turn on the phone-wide sync once in awhile, if you leave it switched off). You don't need to use backup apps included by the phone manufacturer this way. If you're using a Nexus phone this would be the default, this one's more for the rest of us. Also, it is easier to sort your contacts, as you can open up Gmail on your computer and sort it there, and it would sync to your phone. If you're importing contacts from another phone, if you can figure out a way to get it into Gmail, then you've got it on your phone too!
Same goes for Calendaring, I prefer to use Google Calendar, or an app that runs on top of Google Calendar. This way, you only need a browser on your computer to access it. You get the drift, use the services provided by Google, it's easier on the phone, while syncing and backups become a non-issue.
There is more than one button!
This is mostly for the Apple people. In addition to the Home button, there is a Menu button, usually a hardware or (more elusive) touch button, which will reveal much when pressed! Many apps have no indication that there is a menu with awesome options hidden away inside it. So remember, you have a Menu Button!
Most phones will have you signed in to Google Talk, and you won't know this. People will message you, and you might not know this also! So do remember to check, or sign out of it.
Tips for saving battery:
- Explore apps on your phone and see what else you're signed into or which apps you don't use are running in the background. Turn them off or remove them altogether.
- Turn off sync: You can switch it off for your entire phone, or selectively turn off certain apps under Settings, if you really need your email but want to avoid things like Facebook, for example.
- Adjust your screen's brightness settings. Large screens can drain batteries real fast.
- 3G/4G connections will use up the most amount of battery. Switch to Wi-fi or 2G for a longer battery life. Or turn off all data connections for a way longer battery life and some notification-free silence!
- Get an app like Juice Defender which will help you conserve battery.
Security-wise:
Lookout is one of my favourite apps. It keeps bugs out of your phone, and in the event of a lost phone it can help you out. And if you've synced everything to Google you'll never have to worry about losing much with a dead/lost phone.
I know I haven't gone in to detail on the how-to's, but now that you know what to do, you can refer to your manual or look it up!
I know I haven't gone in to detail on the how-to's, but now that you know what to do, you can refer to your manual or look it up!
January 17, 2012
Out of internal memory on your Android phone?
This is a problem that is going to be a problem of the past soon, but till then some of us still gotta deal with it. My LG Optimus One has an useless amount of internal memory (170Mb user accessible according to GSMArena). It's a bitch when free space goes below 20Mb, everything stops syncing.. and then there came that day where I couldn't move/remove anymore apps, or had no more caches to clear!
Here's METHOD ONE, which got me a decent amount of space (via Androinica):
1. First you have to enable USB debugging on your Android device from Settings > Applications > Development > USB debugging.
2. Now you need to download and install the Android SDK. Once you’ve downloaded and extracted the package to the folder of your choice, run SDK Setup.exe and click on Available Packages to the left. If you get an error message at this point, enable “Force https://…” in the Settings. From the list of available packages, select “Usb Driver package”, click on the Install Selected button in the bottom right corner and follow the prompts.
3. Connect your phone to your computer with a USB-cable. Your OS will prompt you to install new drivers. Choose to install them from the android-sdk/usb_driver folder. Do not mount your device; you only need to plug-in the cable.
4. Next, run a command prompt and navigate to the Android-SDK\tools folder. In Windows, this is done by selecting Run from the Start Menu (or by pressing Win+R) and typing cmd. You change drives in the command prompt by entering the drive letter followed by a colon (:), and change folders with the CD command. For example, to enter the Android-SDK folder, simply type cd android-sdk.
(Update: I believe this folder is different in the newer SDKs, look for a text file with updated file locations. It's in there somewhere!)
5. In the Android-SDK\tools folder, type in adb devices and you should get a serial number starting with “H” in return. All you have to do next is entering adb shell pm setInstallLocation 2. Voilà, you’re done! Android will now install apps to the SD card by default.
6. To switch back to storing software on the internal memory, enter adb shell pm setInstallLocation 0.
Install App 2 SD and it will let you move out some apps to SD that you couldn't earlier, and help you clear out some caches you may have missed.
That last me a couple of months, until I got a few more apps and got stuck again!
Here's METHOD TWO in summary:
1) Root you phone:
Google for your phone model and Android version to find the right tools. I used SuperOneClick and the GingerBreak method. Note: you don't have to install a custom ROM, just root your phone only.
2) Partition your SD card so that it has two partitions:
Connect your phone to your computer, mount the SD card and partition it. I used Magic Partition Manager on my PC.
- Shrink the existing partition to make space for a 2nd partition
- I created a FAT32 partition in the new space
- Don't forget to make it a primary partition
- Mount it and reboot your phone
3) Install Link2SD
Enable USB Debugging on your phone. In the app's options, select Create Link. You'll have to reboot your phone once or twice (follow instructions given in the app each time you open it after booting)
If all goes well, you will be able to move more apps from within Link2SD, and if you can't move them you can create a link to the partition on SD.
After all that madness I've recovered a measely 15mb or so of internal memory.. which is big deal! Now lets see how long it last.
April 14, 2011
Google Chrome: quickly search your history, and other customisations
I'm a Chrome fan, but this is one thing Firefox, and only Firefox (so far), does really well - the FF Awesome Bar is pretty awesome when it comes to searching. When you type something into the address bar, it searches the net, your history, your bookmarks etc, all at once.
Chrome is not so good at this, especially the stuff in your history. I really have to open up the history and get down to some dirty searching sometimes.
Here's a quick way to get around this if you have the same problem.
Right click the Chrome address bar and choose 'Edit Search Engines'. Add a new entry there with the values..
Name: chrome history (or whatever you want to call it)
Keyword: h
URL: chrome://history/#q=%s
Done!
Now all you gotta do is type an 'h' in the address bar, before you type what you're looking for, and Chrome will search your history for you.
A couple of search strings I came across:

If you want to customize your search string to auto-include keywords you always include:
(Example using Google search)
http://www.google.com/search?q=%s&q=yourkeywordgoeshere
You can chain more keywords by adding '&q='
Chrome is not so good at this, especially the stuff in your history. I really have to open up the history and get down to some dirty searching sometimes.
Here's a quick way to get around this if you have the same problem.
Right click the Chrome address bar and choose 'Edit Search Engines'. Add a new entry there with the values..
Name: chrome history (or whatever you want to call it)
Keyword: h
URL: chrome://history/#q=%s
Done!
Now all you gotta do is type an 'h' in the address bar, before you type what you're looking for, and Chrome will search your history for you.
A couple of search strings I came across:
If you want to customize your search string to auto-include keywords you always include:
(Example using Google search)
http://www.google.com/search?q=%s&q=yourkeywordgoeshere
You can chain more keywords by adding '&q='
November 8, 2010
Downloading mioTV Singtel BPL Highlights on your iPhone
If you happen to be subscribed to Singtel mio Stadium on your
mobile phone (a great service for its postpaid customers at $5 a
month) then here's a handy tip for you. This is extremely handy if you
wish to watch the clips again, or in places with low reception (such as the subway) or simply show them to your friends later!
You will need a few things before you get started:
Click on a highlight link to download it
 Safari Download Manager should give you the following options:
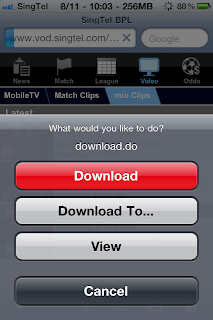
Select Download
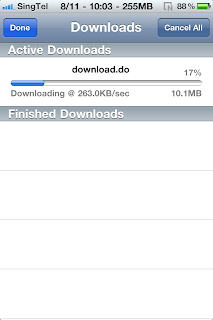
The download.do file itself is not a recognisable media file and will
not be playable. As such you will need to rename it appropriately.
With iFile navigate to the correct folder (/var/mobile/Media/Downloads by default) and click on
the arrow next to the file to view its properties.
Delete the .do (JAVA servlet file) extension and add .m4v (MPEG-4 Video File) instead.
Click Done and you're good to go!
You can either view the files with iFile's native player or use VLC!
If you wish to easily access the files from VLC for later viewing
simply cut the file (using iFile) and paste it in
/var/mobile/Applications/VLC/Documents
You might have to turn on Application Names in iFile's settings if you
have trouble finding the VLC folder.
NB: I've not tried this with the Safari Download Plugin but it might
still work.
mobile phone (a great service for its postpaid customers at $5 a
month) then here's a handy tip for you. This is extremely handy if you
wish to watch the clips again, or in places with low reception (such as the subway) or simply show them to your friends later!
You will need a few things before you get started:
- a jailbroken iPhone
- subscription (and therefore access) to Singtel BPL on mobile
- Safari Download Manager (available on Cydia)
- iFile (available on Cydia)
- VLC (available on iTunes)
Click on a highlight link to download it
 Safari Download Manager should give you the following options:
Select Download

The download.do file itself is not a recognisable media file and will
not be playable. As such you will need to rename it appropriately.
With iFile navigate to the correct folder (/var/mobile/Media/Downloads by default) and click on
the arrow next to the file to view its properties.
 |  |
Delete the .do (JAVA servlet file) extension and add .m4v (MPEG-4 Video File) instead.
Click Done and you're good to go!
You can either view the files with iFile's native player or use VLC!
If you wish to easily access the files from VLC for later viewing
simply cut the file (using iFile) and paste it in
/var/mobile/Applications/VLC/Documents
You might have to turn on Application Names in iFile's settings if you
have trouble finding the VLC folder.
NB: I've not tried this with the Safari Download Plugin but it might
still work.
October 13, 2010

September 20, 2010
.NET 3.5 causing problems in software installations
I've been trying to install ArcGIS 10 on Windows 7 and I kept getting this error. All day long! Frustrating stuff.
Some searching showed that people trying to install iTunes and other applications have also had similar issues.
So what I gathered is, it's a .NET problem. The error message can vary but what you need to look out for is "an error occurred during the installation of assembly..". This article gave me the required clues. The fixes in it are slightly back-dated, so I had to figure something out myself.
For some reason the .NET 3.5 or 3.5 SP1 standalone installer does not run, at all. (I tried running as Administrator etc too). Windows 7 comes with .NET 3.5 which you can remove and re-add (Control Panel > Programs and Features). This seemed to be the only way I could 'reinstall' .NET 3.5, which is required by ArcGIS.
I also installed .NET 4. I'm not sure if this had any effect or not, but after these last two steps, the installations finally completed!
February 18, 2010
Windows 7 Firewall blocks Windows Update by default?
So this seems to happen on some installations! It didn't happen at home, but it happened on my work PC. Weird.
Here's how to fix it:
Control panel -> Network and Sharing Center. Click "Change adaptor settings" (on the left hand side). Right click "Local area connection" and select "properties"
In the "This connection uses the following items" pane click on "Internet Protocol Version 4 (TCP/IPv4) Don't untick it....just click on the line so it's highlighted Click "Properties"
Check the box "Use the following DNS server addresses" and input:
Preferred DNS server: 4.2.2.1
Alternate DNS server: 4.2.2.2
Subscribe to:
Comments (Atom)

